
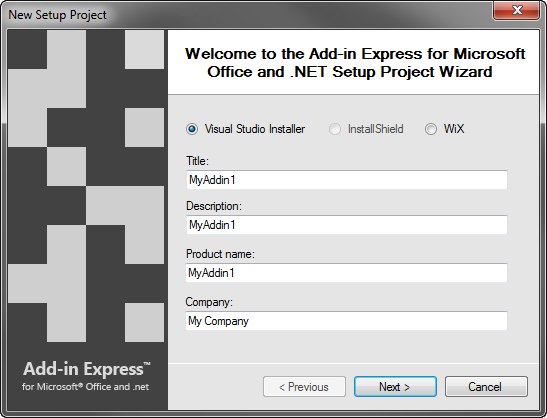
To help you create an installer for your Office plug-in, Add-in Express provides the setup project wizard accessible via menu Project | Create Setup Project in Visual Studio. Another way to run the wizard is shown in the screenshot. Let's run the setup project wizard for the sample project described in Writing Microsoft Outlook COM add-in. The below describes creating a standard setup project in Visual Studio 2005-2010. You may also want to check Creating a WiX setup project. The setup project wizard supports creating setup projects for InstallShield 2009 Professional and higher. The Express editions of InstallShield are not supported. Specify the file name, localization and output directory for your setup project. The wizard creates and adds the following setup project to your Office add-in solution: The wizard creates the following entries in the Application Folder of your setup project (see menu View | Editor | File System): Also, the following custom actions are created for your setup project. They will be performed on the end-user's machine to register your add-in after installation and unregister it before uninstallation: Creating an .MSI setup project for Office add-in manually You can create a setup project using the setup project wizard and check all the below-mentioned settings. To create a setup project manually, follow the steps below. Add a new setup project Right-click the solution item and choose Add | New Project to add a new setup project to your Visual Studio solution. In the Add New Project dialog, select the Setup Project item and click OK. This will add the setup project to your solution. File system editor Right-click the setup project item and choose View | File System in the context menu. Application folder \\ Default location Select the Application Folder and specify its DefaultLocation property as follows: Primary output Right-click the Application Folder item and choose Add | Project Output to add the add-in's assembly to your setup project. In the Add Project Output Group dialog, select the Primary Output Item of your Add-in/RTD Server/Smart Tag project and click OK. For the sample add-in described in How to develop Microsoft Office COM add-in, this adds the following entries to the Application Folder of the setup project: Select AddinExpress.MSO.2005.tlb (or AddinExpress.MSO.2003.tlb in Visual Studio 2003) and, in the Properties window, set the Exclude property to True. Always exclude all .TLB and .OLB files from the setup project except for .TLBs that you create yourself. If a COM add-in or RTD server is installed on the per-user basis, or if you deploy a smart tag or an Excel UDF, the value of the privileges argument above is user. If a COM add-in or RTD server is installed on the per-machine basis, in other words, if the RegisterForAllUsers property of the corresponding module is true, the value of the privileges argument above is admin. Say, for an add-in described in Developing Microsoft Office COM add-ins, the Arguments property for the Install custom action contains the following string: /install="MyAddin1.dll" /privileges=user Dependencies Right click on the Detected Dependencies section of the setup project and choose the Refresh Dependencies option. Also, exclude all dependencies that are not required for your setup. Launch conditions Right-click the setup project item and choose View | Launch Conditions in the context menu. Make sure that the .NET Framework launch condition specifies a correct .NET Framework version and correct download URL. Note that we recommend using launch conditions rather than pre-requisites because installing a pre-requisite usually requires administrative permissions and in this way installing a per-user Office extension may result in installing the extension for the administrator, but not for the user who ran the installer. Prerequisites Right click the setup project and open the Properties dialog. If administrative permissions are required to install prerequisites, then for a per-user Office extension, the elevation dialog will be shown on UAC-enabled systems. If the administrator's credentials are entered in this situation, then the installer will be run on behalf of the administrator and therefore, the Office extension will be installed for the administrator, not for the user who originally ran the installer. Click the Prerequisites button and, in the Prerequisites dialog, select required prerequisites. Final touch Rebuild the setup project. Specify the following command line in the PostBuildEvent property of the setup project: If the RegisterForAllUsersProperty of the module is false or if that property is missing: {Add-in Express}\\Bin\\adxPatch.exe %BuiltOuputPath% /UAC=Off If the RegisterForAllUsersProperty of the module is true: {Add-in Express}\\Bin\\adxPatch.exe %BuiltOuputPath% /UAC=On Now build the setup project, copy all setup files to the target PC and run the .msi file to install the add-in. However, to install pre-requisites, you will need to run setup.exe. This is an extension for Visual Studio that allows developers to quickly create WiX-based setup projects in a familiar Visual Studio way. The Designer for WiX Toolset lets you forget the plain Windows Installer XML and concentrate on your deployment logic. It integrates several editors with the Visual Studio IDE and provides a set of vdproj designers to configure the file system, registry, user interface, custom actions, launch conditions and more for your setup projects.
Web Setup project (. msi), Builds an installer for a Web application. Cab project (. cab), Creates a cabinet file to download to a legacy Web browser. Setup Wizard.
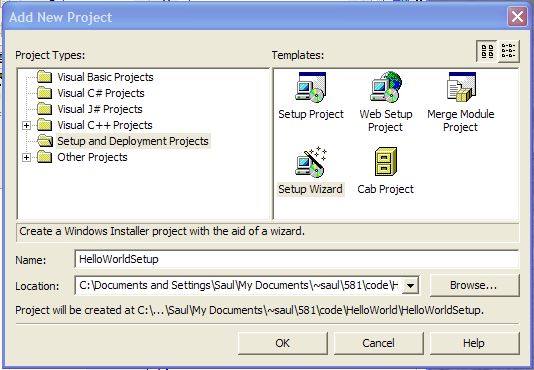

Шаблон Setup Project (Проект установки) создает файл msi, используемый инсталлятором Windows (Windows Installer) для настольного или распределенного приложения Проект установки (Setup Project) не предназначен для развертывания приложений, основанных на технологии WWW, так как для этой цели используется специализированный проект сетевой установки (Web setup project) Проект установки (Setup Project) генерирует программу...

You can create an MSI package by using a Visual Studio Setup project and then using ORCA to edit the properties of your MSI package. You need to edit the.